Showing posts with label Repurpose. Show all posts
Showing posts with label Repurpose. Show all posts
Wednesday, August 7, 2013
Dish Organizer
Tuesday, July 30, 2013
Organizing Food Storage Containers and Lids
Since I do not have a lot of counter space, I work as much as possible on keeping a clear counter. Optimizing the kitchen cabinets to the best of their storing and organizing abilities is one of my most important tasks, and the corner carousel is definitely getting there. On the top shelf, I have my kitchen utensils organized in metal mesh letter tray, and the bottom shelf is filled with food storage containers and their lids as well as the pots and pans lids!
I used to have the containers piled into each other, on top of each other, in a cabinet, with the lids on the side, sometimes if possible staked into a larger container.
Of course, the one container I needed was the one all the way in the back most of the time, and the lids would fall all over the place, on the floor, etc. I had enough of that mess, as you can imagine...
Better Organization
Monday, July 29, 2013
Storing Kitchen Utensils in a 3-Tier Letter Tray
How a metal mesh letter tray unwanted in the office becomes super handy in the kitchen...
Upright Utensils
Since I do not have many drawers nor much counter space, I store the cooking tools in a cupboard right by the stove. I had them standing up in a basket, but this one used to fall over a lot from the weight of all the utensils and/or as it bumped into a metal hook. It was getting frustrating.
Tuesday, July 23, 2013
DIY Storage Box ~ Lonely Shoe Boxes Find New Purpose
Instead of throwing out shoe boxes, you could reuse them and make pretty storage boxes out of them.
We'll always need a specific place to put special items!
All you need is a shoe box, wrapping paper and glue.
Thursday, June 27, 2013
Entryway Makeover
We have been renting and living in this house for almost 6 months. We must have changed the rooms around at least twice each room!! Personally, I need change, constantly. I think I get bored of one way, but sometimes it's also for the area to be more convenient!
I am not a fan of front doors opening right into the living or dining area, but that's how it is in our house.
I had to somehow make a separation, as well as incorporate a space for purses, keys, change, and most importantly our shoes which we must leave by the door. ~I insist on having a shoe-free house, because I think it's the grossest thing to walk in the streets, get poo and dirt or whatever on our shoes, then bring all those yucky things in our cozy nest...~
I got three Expedit shelving units from Ikea. One of my friends from Florida had done this exact combination of the shelving units in her condo, and I thought it was a great idea. It fit perfectly as my entryway separator. A bit bulky, yet open since the squares were hallow from both sides. I loved this setting.
Monday, June 24, 2013
IKEA Hack
When we bought our bed frame from Ikea, MALM bed frame, we had in mind to eventually add the side tables from the same series. I really liked the set which included 2 shelving units ~with 3 shelves, a 2-in drawer and a glass top~ and a long hollow piece, as long as the bed frame, which would go between the wall and the bed. The shelving units were on wheels, and you could bring them in and out of the long piece, therefore hiding the shelves behind the bed.
However, at $150 for this three-part set, we could not afford it right away.
 |
| Here is the set. This was taken in our bedroom, before the bed frame went in front of it. |
A month later, we went back to Ikea to look for lights and, oh what a surprise, the MALM bedside sets were on sale for $50!!! ~yes a $100 discount~ Now, that was a good deal!
~They must have been discontinued because I can't even find them in their catalog anymore...~
Thursday, June 20, 2013
Pimp My Jar
A simple way to make a glass jar more attractive
Here was a simple sauce jar I had and wanted to use to store rice away.
Wednesday, June 12, 2013
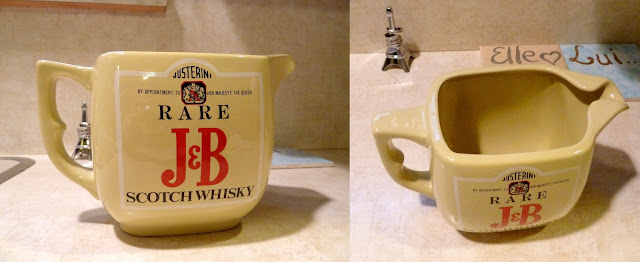
Remodeled Pitcher
When we moved in, our super awesome landlord let us keep a few items that she had left here. Among them, this pitcher.
I really liked it for some reason, but definitely not a fan of the J&B Scotch Whisky advertisement!!
Friday, May 24, 2013
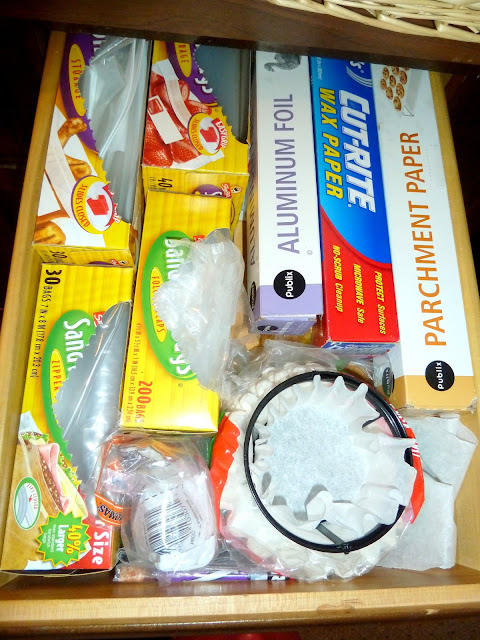
Storage Bags Extravaganza
Here in the U.S., storage bags ~ziploc~ are a must in a household. Whether it is to pack a sandwich, put some leftover away, or store chips and crackers in a resealable bag, I probably use them on a daily basis, and I am sure I'm not the only one!!
So of course when we moved into the house, I had to buy a bunch of them ~4 different sizes~ which I had tucked away in a drawer next to the rolls of aluminium foil, etc.
Wednesday, May 22, 2013
Making a Box
I needed a box for some baking supplies. I wanted a pretty one and one that fit perfectly in the cabinet it was going to go into. I looked around, but no luck. None of the boxes I owned could fit in the cabinet. So I had to find a cardboard box, and I got this one ~perfect size!~. I decided to transform it into a pretty baking supplies box!
Need:
- A cardboard box
- A pair of scissors ~or box cutter~
- Some shelf liner ~the sticky kind is the best~
- Some packaging tape ~its width is great for this project~
{make sure to click the "Read More" button under the picture for more detail}
Thursday, April 18, 2013
Kitchen Windowsill Garden
I love having a window right above the sink! It's wonderful to be able to wash dishes or do whatever I may do in this area and see birds, flowers, snow ~in the winter~. I think it's therapeutic and relaxing to be able to glance out the window and see pretty things while doing not-so-fun house chores. I've missed having that a lot in FL, so I enjoy it even more now!
I really wanted to have some fresh herbs in the kitchen, but the windowsill was too narrow.
I really wanted to have some fresh herbs in the kitchen, but the windowsill was too narrow.
Wednesday, April 10, 2013
Hanging Towels in the Kitchen
Yes, I do have a dishwasher, but sometimes there are items in the kitchen that are not dishwasher proof!
For those, I have a dish mat, which I really like. I used to have a wire dish rack but that would always fill up and look messy. Now at least, with the mat I have to keep putting the dishes away as soon as they are dry! It works better for me.
Sometimes though, I don't have enough room or time to let some things hang around on the counter. So I keep a dish towel near by to dry whatever I need quickly. And, I also have a towel for drying hands.
Since we moved in, I've been having issues finding the best place in my new kitchen for these towels.
In the condo in FL, I used to have them over the handle of the oven door. It was perfect, handy and they would dry quickly.
This oven now doesn't have a handle that sticks out which could enable me to do the same, so I started tucking part of the towel in the the door... As such:
Thursday, March 7, 2013
Prettifying Metal Can for Office
I like to reuse household items whenever possible. A simple example of this is using an empty ~and cleaned of course!!~ can as a pen holder.
So I figured that if I was going to use such a cheap thing to hold my pens in the office, I could at least beautify it a bit!
Needed for this project:
So I figured that if I was going to use such a cheap thing to hold my pens in the office, I could at least beautify it a bit!
Needed for this project:
- a can
- duck tapes ~2 different colors~
- a pretty ribbon
 |
| ~Vegetable Can becomes Pen Holder~ |
Saturday, March 2, 2013
Updating Under-the-Kitchen-Sink Cabinet!
Rearranging the kitchen is a lot of fun, especially when you end up with more space in the room!
Last Tuesday, I rearranged the cabinet under the kitchen sink {click link to view post} by just adding an upside-down cardboard box ~found in my basement, ready to go to the recycle center~ and 2 small plastic bins form the dollar store.

It's been more practical. Now I can get anything I need right away, without moving stuff around!
Today, I wanted to beautify it a bit.
I simply added a colorful polka dot shelf liner on top of the box ~found at my local dollar store~ and... Ta Da!!
It makes it so cute! Or at least more enjoyable to look at!
Simple, easy, tiny change... Love it!!
Make Little Changes For A
Life in Positudiness!
Xoxo
~Sandie
Subscribe to:
Posts (Atom)


